")
Power banks are our lifesavers when we’re running low on battery. But what do you do when yours stops working? Before you toss it out, consider fixing it yourself. Opening a power bank without screws might seem tricky, but it’s totally doable. Let’s walk through it step by step.
Why You Should Give It a Try
Most people think if a power bank breaks, it’s time to buy a new one. But repairing it can save you money, and it’s much easier than you might think. Plus, fixing things yourself is a great way to reduce waste, and you get to learn something new.
Know Your Power Bank
Power banks come in different shapes and designs, but many are sealed with clips or adhesive instead of screws. This can make it hard to open. Think of it like peeling an orange—once you find the right spot, it comes apart easily.
| Name | John Doe |
|---|---|
| Profession | DIY Electronics Expert |
| Specialty | Gadget Repairs, Electronics Tinkering |
| Website | Power Bank Repair Tips |
Tools You’ll Need
You won’t need much to open your power bank, but having the right tools will help. Grab a plastic pry tool, a small flathead screwdriver, and if you have one, a hair dryer or hot air gun. Gloves are a good idea too, just to keep your hands safe.
Step 1: Turn It Off
First, make sure your power bank is off. If it’s swollen or leaking, take extra care. You want to avoid any accidents with the battery.
Step 2: Find the Right Spot
Look around the edge for seams or spots where the plastic might be thinner. This is where the magic happens. You’ll want to start prying from here. If it’s really stuck, a little heat from the hair dryer can soften any adhesive and make it easier to open.
Step 3: Use a Plastic Pry Tool
Gently insert your pry tool into the seam. Work it around the edges, applying light pressure. Be patient—too much force could crack the case. If you can’t get it, a flathead screwdriver can help nudge it open, but don’t force it.
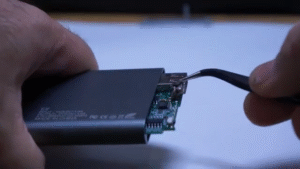
Step 4: Separate the Case
Once the case starts to open, carefully pull it apart. Watch out for wires or clips inside that might still be attached. Go slow, and make sure nothing gets damaged in the process.
Step 5: Inspect and Fix
Now that the case is open, check out the internals. Look for any obvious issues—damaged wires, corroded battery terminals, or a broken charging port. If the battery’s bad, you’ll need to replace it. If it’s just a loose connection, re-solder it and you’re good to go.
Step 6: Reassemble and Test
Once you’ve fixed everything, put the power bank back together. Make sure everything fits back into place. Plug it in to test if it’s charging properly. If it works, congratulations! You’ve just saved yourself the cost of a new power bank.
Why It’s Worth Repairing
Opening and fixing a power bank without screws is a handy skill to have. Not only do you save money, but you’re also helping the environment by reducing e-waste. Plus, it’s pretty satisfying to bring a device back to life.
For more tips and tricks on fixing gadgets, check out resources like Instructables.